

A BOTANICAL CABINET OF CURIOSITIES
I’ve gotten so many requests for information about this DIY project, I thought I would dedicate a webpage to it! Here you will find information about what you will need, and how to put things together. This is just one version- you can also adapt the tall IKEA FABRIKÖR or the IKEA MILSBO cabinets into sturdy, climate-controlled indoor greenhouses or vivariums. It’s a wonderful cabinet of curiosities to curate your botanical obsessions!
For this DIY project, I used the short Fabrikör, so information is specific to that cabinet. For more more inspiration, check out #ikeagreenhousecabinet and it’s creator’s page @robinschoutenart
If you find this information useful, please feel free to donate below

A BIT ABOUT ME: I have been growing orchids for about 20 years and have recently gotten into miniatures, begonias and carnivorous plants. I am also an artist and art teacher (remote classes available if interested). You can see some of my art, which sometimes includes my plants, by clicking on ARTWORK at the top of the page. You can also follow me @brandons_orchids and @brandonflye
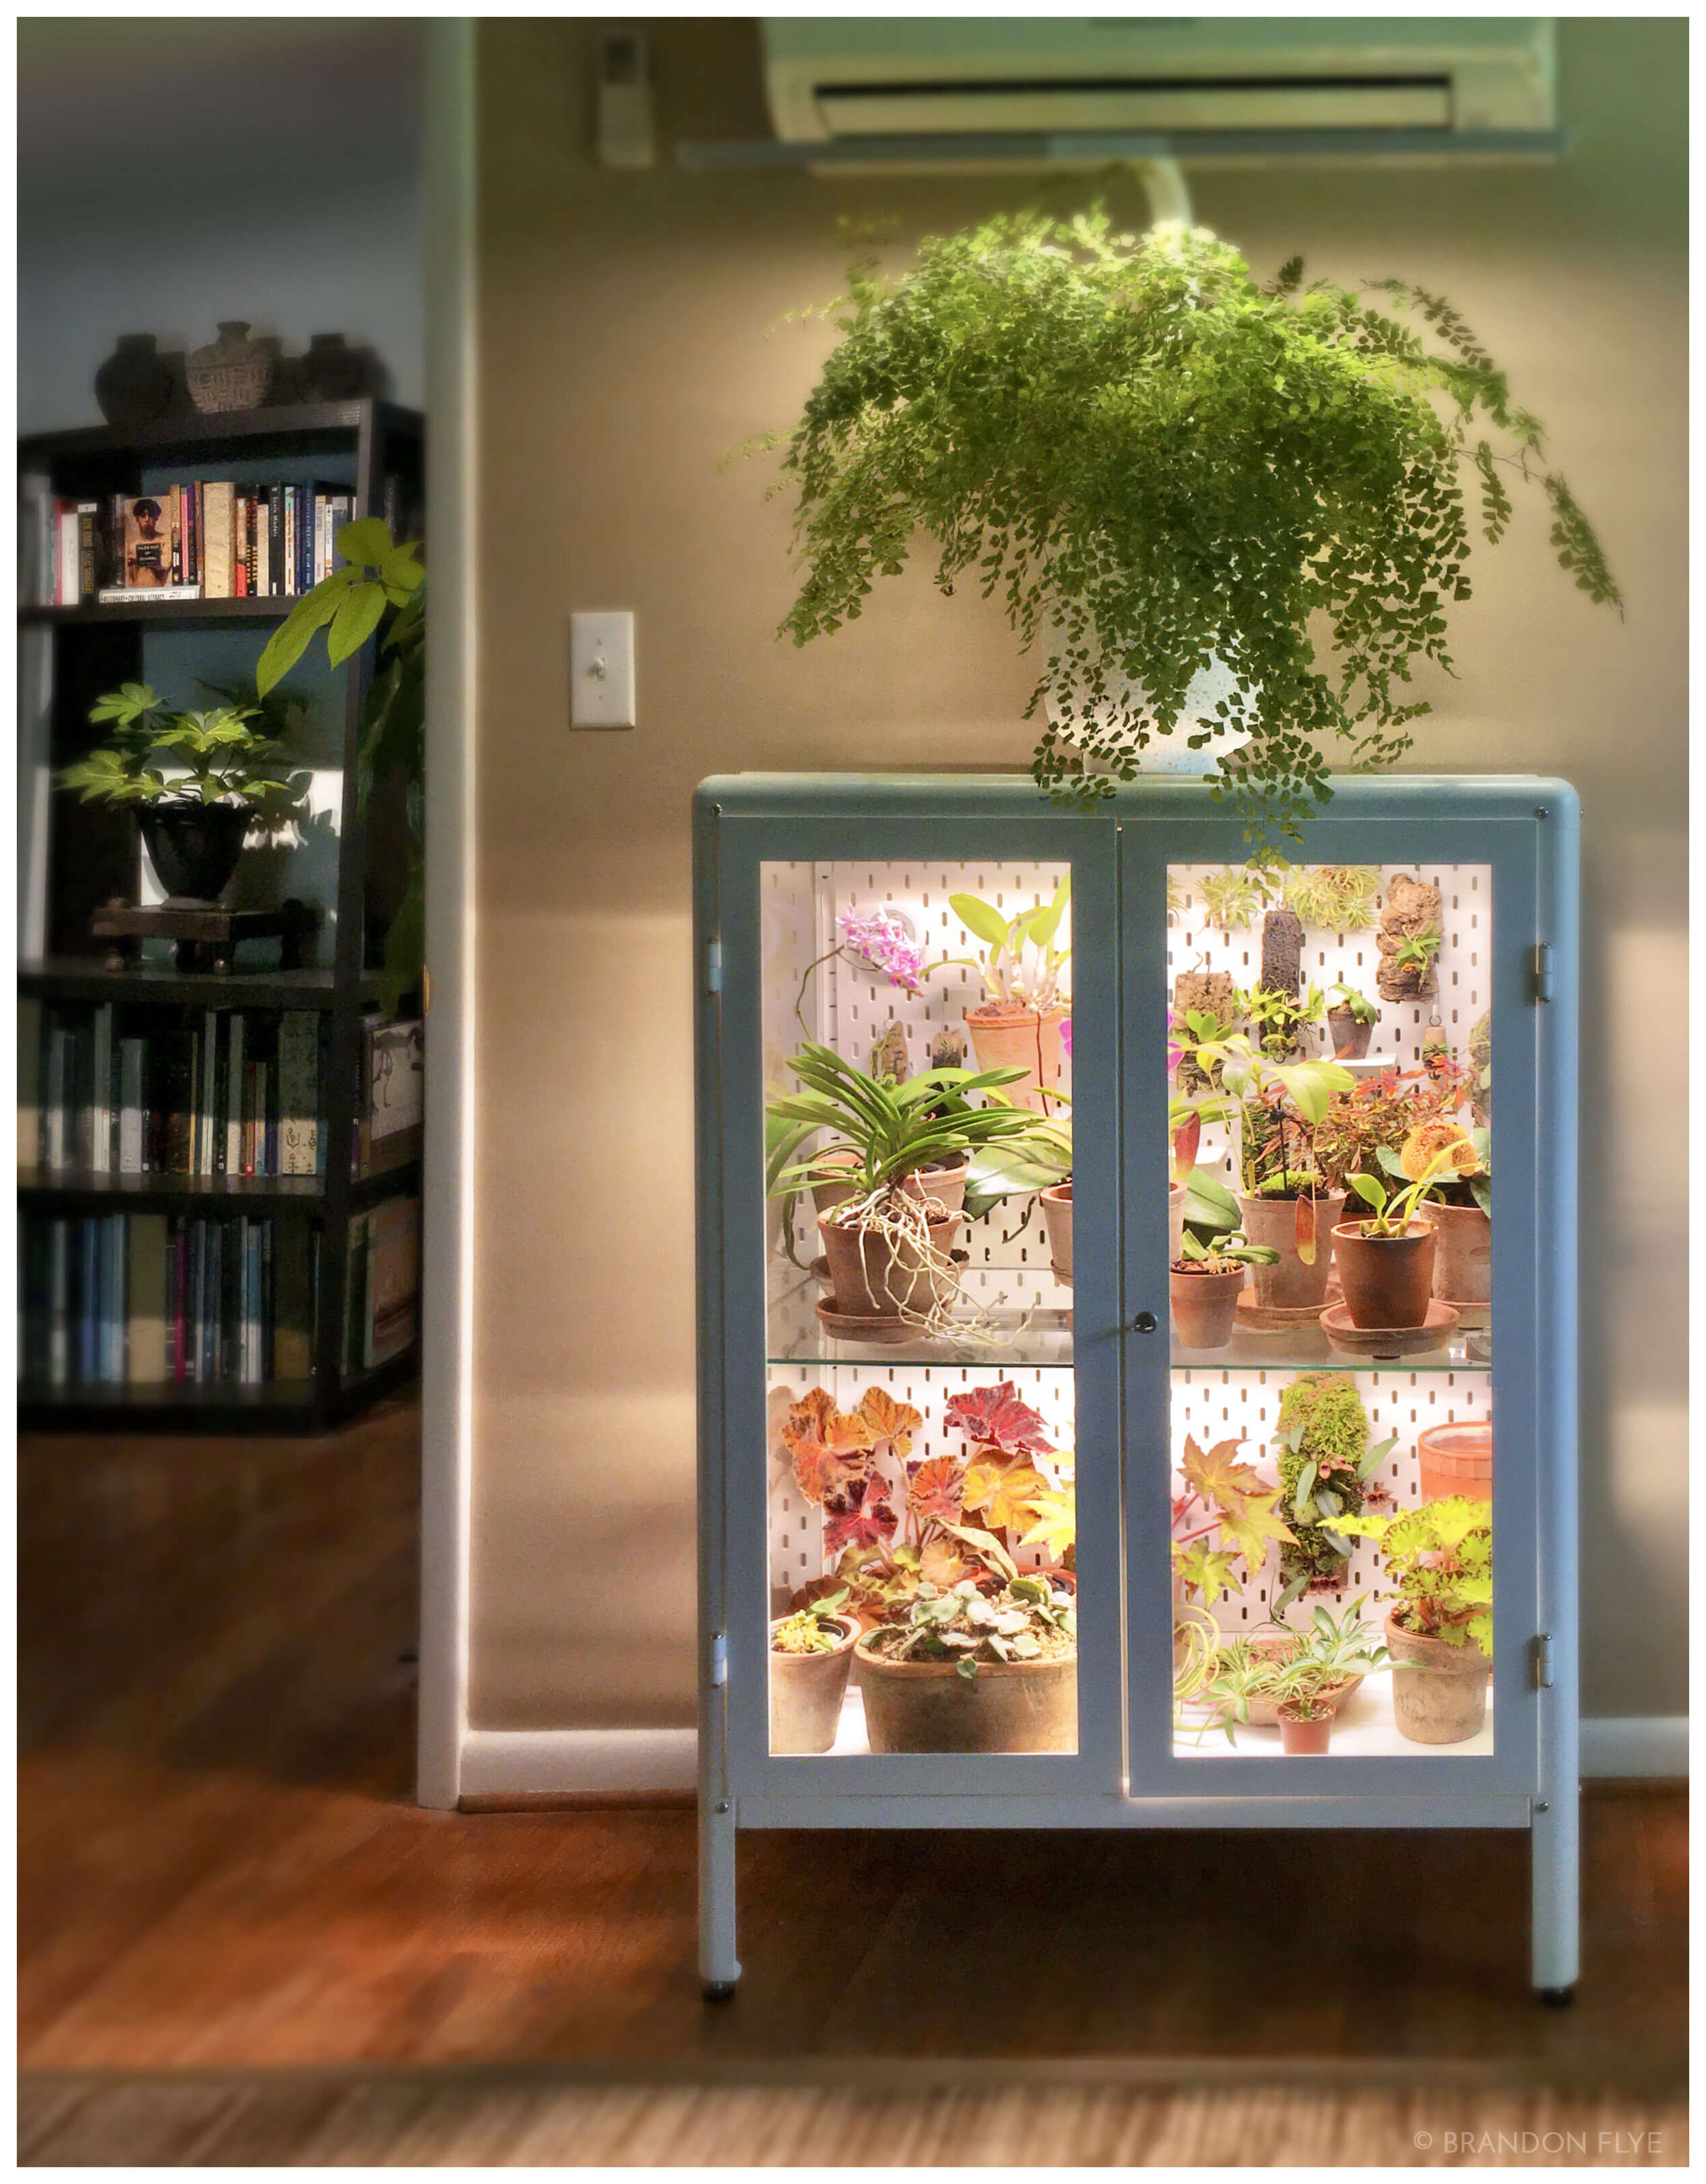
MY SETUP:
The Fabrikör cabinet’s powder-coated finish makes it a durable option for a mini indoor greenhouse. In my cabinet, I keep the humidity between 65-85% humidity, yet I prefer not to spray, mist, or let water sit on any of the surfaces. A small humidifier does the job of keeping the air moist and plants happy. I also only use homemade distilled water in the humidifier to avoid mineral deposits on the glass (more on my DISTILLER UNIT below). If you grow orchids, fresh air exchange and good air circulation is a must. I have removed one of the 2 panes of glass at the rear of the cabinet and fresh air comes in through the holes in the pegboard. I also have 4 small computer fans (2 per shelf) running continuously. Most of my miniature orchids get dunked in a tub of water daily, and the air flow is critical to making sure they dry off a bit by evening to avoid fungal or rot problems. If you are only growing humidity loving plants such as carnivorous plants, Aroids, Anthuriums, or Philodendrons, you might choose to leave both back glass panels intact as these plants need the highest humidity you can provide. The Ikea SKÅDIS pegboard is a great way to display miniature plants. I have waterproofed the pegboard using a silicone water sealant for added longevity. I use the SKÅDIS hooks to hang some of my plants, and the SKÅDIS containers (sans the container) as shelves for small potted plants. The pegboard allows you to stage miniatures for optimal light and display. The 2, LED T5 lights I found have proven to be a great choice. Not only does the full-spectrum light look great, they are also more than adequate in terms of PAR, PPFD, light quality, and most importantly low heat production (with the wrong lights, temps can skyrocket quickly). They are usb-powered and automated via a timer. Each light has two strips of LEDs that are controlled independently by their own on/off switch, allowing for more flexibility in terms of light intensity. As I add more plants and tinker with placement and climate, I’m sure I will find out more things which I will gladly share here.


WHAT YOU WILL NEED
CLICK ON ANY ITEM TO OPEN A LINK TO THE PRODUCT
TOOLS
TABLE SAW OR CIRCULAR SAW
UTILITY KNIFE
SMALL PAINTBRUSH & WHITE PAINT OR GESSO
1.5” HOLE SAW BIT AND DRILL
+ ASSEMBLING YOUR FABRIKÖR
SPECIAL NOTE: If you want ventilation in your cabinet, install all of the glass per instructions except for the rear right panel. With the panel removed, fresh air can come in through the pegboard holes.
+ INSTALLING THE PEGBOARD
CUTTING THE PEGBOARDS:
You will need to cut down both of your 30”x22” SKÅDIS pegboards to 30"x20" and 30"x15.5", making just one cut per pegboard- but pay attention to which side you cut or you will end up wasting them. The 30" width fits perfectly with no trim necessary.
NOTCHING THE CORNERS: At the top corners of the shorter trimmed pegboard (30"x15.5"), you will need to cut a little v-shaped notch for the metal bracket that holds up the glass shelf (see below). This is the cut side of the pegboard (not the side with rounded corners). I traced the bracket, added a little extra space and was able to cut the notch with just a utility knife, making several scores. You can also cut the notch using a hacksaw or jigsaw.

ADDING CORD GROMMETS: In the upper right corners of each pegboard, measure and mark a dot 1.5" in from top and side. Use your 1.5" hole saw bit to drill a hole where marked. The grommets should fit perfectly. Use a very small bead of silicone or glue at the rim of the grommet, then secure them into the holes.

PAINT EXPOSED EDGES: using a small craft brush, paint any of the exposed edges of the pegboard with either white acrylic paint or gesso.
WATERPROOF THE PEGBOARD: In a ventilated space lay the pegboards flat on a stool or box and spray each side per instrucions with the Rustoleum Leak Seal.
ATTACH PEGBOARD AND GLASS SHELF: If you have already installed all of the glass panels in your Fabrikör, remove the rear right panel of glass (this will allow for air exchange and exit of all of your cables)- make sure to fold flat the little metal tabs that are used to secure the glass or they will keep your pegboard from securing tightly to the back wall. Use Gorilla or 3M brand double-face tape and add a few squares along the center divider of the cabinet between the back glass panel openings. Put the lower Pegboard against the back of the cabinet but do not push against the double stick tape until you have your fans and lights installed. Add the glass brackets for the shelf (the two back brackets should fit into your notches). Install the glass shelf, then put the top pegboard in place. Do not stick until fans and lights are installed.
+ INSTALLING THE LIGHTS
I chose to use only the front aluminum shade on each of my lights. If I added the back shade, much more of the back wall was in shadow than I wanted for my hanging miniature plants. Make sure to remove the clear film on each of the tubes (I guess that's for protection?). You can attach your lights however you want. You may want more light towards the back of your cabinet or more towards the front. I chose to mount them about 6.5" back from the front of the cabinet. This puts them in the middle of the grow area. I used 2 squares of Gorilla double sided tape, one on each end of the light. Make sure to mount the lights so that the cord is attached to the right end of both of your lights. You will route the cable through the grommet and use a little cord cover to tidy up the appearance.

+ INSTALLING THE FANS
OPTIONAL- REMOVE THE GRILLS:
I decided that the fan grills made them look bulky and drew too much attention to them. You really don't need them because there won't be anything flying around that can get stuck in the blades.
OPTIONAL- PAINTING: If you want your fans to blend in a bit like mine, you can paint them white. I just used blue painters tape to cover both the front and the back, then spray painted the sides white. Or, you can do like I did on the top 2 fans and simply wrap them with white electrical tape.
OPTIONAL- CUSTOM GRILL COVERS: If you REALLY want your fans to dissappear, you can find custom 3-d printed fan grill covers in different colors. I was lucky enough to find some 3-d printed white ones on Etsy, but it doesn't look like the shop is still around.

ATTACHING THE FANS: The simplest way to attach your fans is by using a piece of double-sided tape on the top of the fan and attaching them directly to the glass- see below. If you're interested to know how I attached my top 2 fans, I made an "L"-shaped bracket out of wire that was folded back on itself. The fan was attached at the end of the bracket using a zip tie and zip tie mounting square. I ran the fan cable in between the folded wires of the bracket and fused everything together by wrapping it in white electrical tape. I did this because I wanted the ability to aim my fans occasionally.

RUNNING THE WIRE AND ATTACHING PEGBOARD: Run your fan wires behind the pegboard if you can or through the grommet. On one fan, I had to cut a little notch on the pegboard for it to fit through. Once all of the cables (including the ones from the lights) are where you want them, permanently attach the pegboard to the back of the cabinet by pressing it against the double-sided tape.

THE PERFECT PLACE TO GROW!


SOME MINIATURE ORCHIDS FROM MY CABINET
Follow me @brandons_orchids


